Time to read: 2 minutes
How to Replace an Oticon Receiver
Oticon receivers come in 4 different powers, 3 of which can be changed by the end user. These receivers are the 60, 85 and 100.
To change a receiver, you need to first ensure that you have the following things in front of you:
- Your hearing aid
- New receiver (check that it is for the correct side and the same power as your existing receiver) and,
- A pin removal tool.
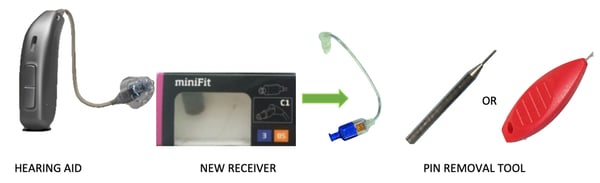 Everything you need to change your Oticon receiver
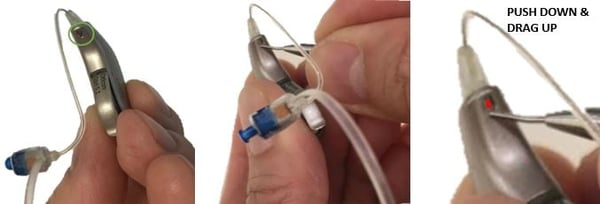
Remove the existing receiver
Locate where the receiver is connected to the hearing aid.
On the underside of the hearing aid, you will see a small notch indent. Insert the pin removal tool into the bottom (smaller) section of the notch and gently push down and drag up towards the tip of the hearing aid to remove the existing receiver.
You will see the receiver slide out of the hearing aid.
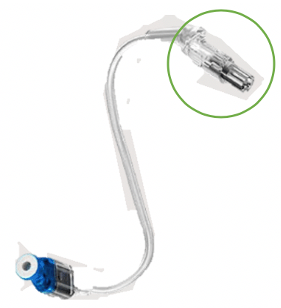
Replace with a new receiver
Take your new receiver. Locate the top end of the receiver (circled below). This is the connection you need to insert into the hearing aid. Push the receiver connection gently into the hearing aid. You may feel a small click as the receiver locks into place.
Check our video on How to Replace an Oticon Receiver on YouTube.
Did you know that we have a great range of how-to videos on YouTube? You might find these quick and easy to follow tutorials just the thing to assist you in keeping your hearing aids in great working order. Be sure to subscribe to our channel so you don't miss out on a new video.
Can we help? We're delighted to answer questions you have about hearing, hearing loss and hearing aids. We encourage you to use the search feature on our web site. If you cannot find the answer here, then let us know, we'd only be too delighted to write an article or create video.
